Wednesday, June 19, 2013

Tutorial - Recording Videos of Games under MAME

I include a video of myself playing some video game in almost every one of my posts. In addition to the videos I share here, I have a YouTube page where I have 19 videos as of this writing. You might be wondering how I record these videos. In this tutorial, I will explain different methods that can be used to record videos while playing some arcade game on MAME.

The methods that I will discuss will use MAME's built-in "-mngwrite" and "-aviwrite" options and therefore, will not require any additional software (though some additional software may be necessary for processing the video and audio files generated by MAME). I will just mention that there are software which can be used to capture videos from the screen. This process is called screencasting. These programs, such as FRAPS, will record anything you see on screen as opposed to MAME's built-in functions which only record the game screen. In other words, if you press the TAB button to access the options menu, this menu will be a part of the video that FRAPS records but the MAME video will not show this screen. My personal recommendation is not to use FRAPS or any other additional software unless the built-in functions of MAME do not work.

The options "-mngwrite" and "-aviwrite" tells MAME to record the output to a .mng and a .avi file respectively, but the common practice is not to use these commands while playing the game. The reason for this is that these commands, especially "-aviwrite", slows the system down considerably, sometimes to a point where it becomes impossible to play the game. A simple remedy for this problem is to record the input while playing the game and use the record commands while playing this recorded input.

MAME is capable of recording the user input and later playing these recorded input files. In other words, it is possible to create a replay file which contains all the moves you make while playing the game and can later be used to playback the entire recorded game. This is achieved using the "-rec" command. The usage is as follows:

mame -rec <filename>

To playback a recorded game, the "-pb" command is used in the following way:

mame -pb <filename>

Let me illustrate the usage of these commands on an example. Suppose a 64-bit version of MAME is installed in the directory " c:\mame" and you would like to play the game "Hard Hat" and record the input to a file named "input_rec.inp". The command you should enter is the following:

c:\mame>mame64.exe hardhat -rec input_rec.inp

This will create a file "input_rec.inp" in the "c:\mame\inp" directory. If you want, you can edit "mame.ini" file to change where the recorded input files are saved. To playback the recorded file, the following command should be entered:

c:\mame>mame64.exe hardhat -pb input_rec.inp

After entering this command, MAME will look for the "input_rec.inp" file in the "c:\mame\inp" directory and start the replay if this file is found. If this file is in some other directory, then you should enter the filename with the full path.

If there are problems with recording and replaying, you can try deleting the .cfg that belongs to whichever game you are playing. You should delete this file before recording and before the playback. This file is located in the "c:\mame\cfg" directory and the name of the file is the same as the name of the rom of the game. In the above example, the .cfg file will be "c:\mame\cfg\hardhat.cfg". You should also make sure that your version of MAME is the same as the version that was used to record the game.

After recording your input, you can use the "-mngwrite" command to write the recorded game to a .mng file, though it is claimed that this command stopped working on the newer versions of MAME. In addition, this command does not record any sounds from the game. Therefore, the "-mngwrite" command is usually accompanied by the "-wavwrite" command. The usage for these two commands is as follows:

mame -mngwrite <filename> -wavwrite <filename>

The files that were created by this command, by default, will be saved to "c:\mame\snap" folder. This, in addition to any other folder that MAME uses, can be changed by editing the "mame.ini" file in the "c:\mame" directory. You can also turn on/off recording of .mng videos by pressing SHIF + F12 anytime during the game, though with this method you will not be able to record any sound.

These commands can be used together with the "-pb" command. For example, suppose we want to make a video of the game "Hard Hat" from the recording "input_rec.inp" where the name of the video file is "video.mng" and the name of the audio file is "audio.wav". The command that we should enter is the following:

c:\mame>mame64.exe hardhat -pb input_rec.inp -mngwrite video.mng -wavwrite audio.wav

Now, after the playback, the files "video.mng" and "audio.wav" will be saved to the folder "c:\mame\snap". You can then use additional software to combine the audio and video files. There are free software that can be used for this purpose, such as MPlayer. I am not going to be able to offer any help about how to use this program, as this is not usually the method that I use to record my videos.

An easier way to record videos is to use the "-aviwrite" command. Unlike the "-mngwrite" command, the "-aviwrite" command will record both video and audio. The usage of this command is similar to the "-mngwrite" command:

mame -aviwrite <filename>

The files created with this command are saved to the "c:\mame\snap" directory as usual. For example, if we want to make a video of the game "Hard Hat" from the recording "input_rec.inp" where the name of the video file is "video.avi", the following command should be entered:

c:\mame>mame64.exe hardhat -pb input_rec.inp -aviwrite video.avi

After the playback, the file "video.avi" will be saved to the folder "c:\mame\snap". The avi files created by MAME are uncompressed and therefore they are extremely large (about 1gb per minute). You might want to compress these files, especially if you want to share these videos on Youtube or some other website. A free software that can be used for this purpose is Handbrake.

Finally, I will remark that throughout the tutorial, the assumption was that you are using the command line version of MAME, though user interface versions of MAME are also capable of recording and replaying game input and writing video and audio files; however I could not find a way to playback some recorded game and write a video file at the same time. In fact, that was the reason I started using the command line version.

Friday, June 7, 2013

Game Review - Golden Axe

Golden Axe, a side scrolling beat 'em up which was made in 1989 by Sega, is well known both as an arcade game and as a home game. I have a lot of fond memories of playing this game with my friends, though it was the PC version of this game that we played. In fact, I think I only came across this game once or twice in an arcade. There is quite a difference between the arcade and the PC version of this game; after having played the PC version for such a long time, I remember I was amazed when I saw the arcade version which had much superior sound effects and graphics. There were other differences too, I think the PC version was a little longer because I remember the game did not end after beating Death=Adder in the PC version.

There are three characters in this game, each with different skills and abilities, and each with their own reason to go after Death=Adder, the main antagonist in the game. The first of these characters is Gilius Thunderhead, a dwarf from the mines of Wolud whose twin brother was killed by Death=Adder. His attacks are slow, but punishing. Especially, his jumping axe attack has a wide range and is a life saver against crowded or strong enemies. On the other hand, being a dwarf, he is not particularly strong with magic. He can only cast magic spells up to the third level and carry at most four potions, which means the player either has to use the magic spells frequently or waste most of the potions that appear in the game. Nevertheless, his strength in fighting far makes up for his weak magic usage. He is also my favorite character in the game.

Next, there is Ax Battler, a male barbarian whose mother was murdered by Death=Adder. This character has a nice balance between strength and magic; his attacks are not weak and his magic use is stronger compared to the dwarf. He can use his broad sword in a variety of ways against the enemy and his running shoulder attack can be especially useful during the game. He can cast spells up to fourth level and his strongest magic attack uses six potions. He is the ideal character for those who want a strong character that can also make good use of magic.

The last of the playable characters in the game is Tyris Flare, an amazon who seeks revenge for her mother and father who were killed at the hands of Death=Adder. Her strong side is magic usage, she can magic spells up to sixth level. To cast her strongest spell, she needs nine potions, at which point a dragon sweeps the screen from side to side with a powerful fire blast. If you want to play with this character, magic should definitely be a part of your strategy.

Here's a video of me winning the game on a single coin, with the dwarf character:

To say a few words about the gameplay, winning the game with a single coin is difficult but not impossible. One needs to know about strength and weakness of every single opponent, as well as what opponent to expect at which point. The weak opponents, such as those attacking with clubs and maces, are easy to handle unless they are very crowded. One just need to be careful not to be in their way when they do running attacks. Giants with mauls are harder, but they can also be countered without that much trouble. The skeletons and dark, colorless versions of weak guys (who I suspect are undead) are very tricky; not only because of their speed but also because they are hard to kill. It is possible to ride dragons and the little reptile looking animals which attack with their tail, it is usually a good idea to make use of them when they appear. Just to keep in mind, you can still do your running attack while riding these animals and some situations may call for these attacks over their regular attacks.

In closing, I think Golden Axe is a great game which stands the test of time. Anyone with any sort of interest in gaming, especially arcade gaming, should know about and preferably have played this game, in one platform or other. The game also has a grading system where the player is assigned a grade for the skill demonstrated during the game, which makes it desirable to play the game over and over even after winning it once, just to get a higher grade; though it is pretty easy to get the highest grade by winning the game with just one coin, as I got the highest grade with the worst possible play resulting in a single coin win. Just a final note about this game is that there are a number of sequels and spin-offs based on this game; interested player may check those games out.

Thursday, April 18, 2013

Game Review - Operation Wolf

Today's review will be on Operation Wolf, a 1987 shooting game made by Taito. The first time I came across this game was long before the arcade boom in Turkey; so this could actually be the very first arcade game I ever played. There was a 7-Eleven not far from where we lived at the time and they had an original Operation Wolf cabinet on the second floor in a corner, with no other arcade games to accompany it. I loved going to 7-Eleven with my mother at that age, I couldn't imagine any better way of spending time than that. I would eat those disgusting frozen hamburgers or greasy hot dogs, maybe win another one from their scratch and win promotions and of course, play some Operation Wolf. I was barely tall enough to reach the controller and I don't think I was even aware of the little red button on the side of the controller which was used to launch rockets.

Later, when actual arcades opened up in the neighborhood, I started seeing this game here and there. You would definitely notice this game in an arcade, the bad ass uzi light gun would certainly catch your attention. An interesting feature of this game is that if you see an Operation Wolf cabinet in an arcade, it has to be an original cabinet, because generic arcade cabinets don't have the gun that is used as a controller in this game. There were maybe one or two other light gun games, but this one was certainly the most popular at that time.

I also got a chance to play this game at home, in my cousin's Sega Master System. Although they did sell light guns for the Master System, my cousin did not have one and it was a bitch to play this game with a standard controller. I remember playing this game for hours but barely getting past the second stage. Now, running the game under MAME and using mouse as a controller, the game becomes almost too easy to play. Here's a video of me beating the game with just one credit:

To say a few words about the story of the game, our character, Roy Adams, is a Special Forces Operative and he needs to rescue five hostages from a concentration camp in South America. To do this, he first needs to cut the enemies communications and get information about the location of the concentration camp. Then, he needs to raid a magazine and replenish his ammunition. Finally, he should rescue the hostages, get them on a plane and flee.

The game play is pretty straightforward, you need to shoot all the enemy soldiers, tanks, choppers, boats, motorcycles etc. and not shoot the hostages, nurses, villagers, kids and women in bikinis... I am not kidding, there are women in bikinis running around for some reason, for instance see 4:17 in the video. I don't know how one goes from sunbathing in a beach to running away from bullets, but apparently, that makes sense to the developers of this game. There are also items with various effects that you can shoot, such as magazines, rocket bombs, health restoring drinks etc. Also, if you see a pig, chicken or bird, shoot it and you might get a magazine or rocket bomb. Barrels, crates and coconuts on trees might also reveal items.

The game relies heavily on quick reaction and reflexes, but that is not all. Usually, there will be many targets on the screen and the player needs to prioritize these targets in a way to avoid sustaining any injuries or minimize the damage if it is impossible to avoid it altogether. For instance, if there are many soldiers and a helicopter on the screen, it is a good idea to kill the soldiers first and then take care of the helicopter since the damage from the helicopter alone will probably be less than the damage from all of the soldiers combined. Also, resource management is important because sometimes it makes more sense to use rockets while in some situations it is better to save your rockets. For example, when there are many targets on the screen, it may be a good idea to kill helicopters or tanks instantly with a rocket to deal with other smaller targets but if there is a single helicopter on the screen, it should be killed with bullets to save rockets. When there are multiple heavy targets close together, they can all be killed instantly with a single rocket and that is usually a good time to use a rocket.

In conclusion, I think Operation Wolf is a pretty successful game in its genre. It is one of the two shooter games that I really like (the other one is Beast Busters). Three sequels were made after this game by the way, Operation Thunderbolt, Operation Wolf 3 and Operation Tiger. Maybe I will review those games as well, who knows?

Sunday, April 14, 2013

Tutorial - Playing Arcade Games at Home

The arcades of the 90's may have long gone out of business, but it is still possible to play those games at home. I am not talking about buying arcade machines, fortunately there is a more practical way. I am not talking about SNES or equivalent home gaming systems either; while some games do have SNES versions, not all arcade games are available in any other format, not to mention SNES versions of arcade games usually differ from the arcade versions. I am talking about playing arcade games on personal computers, with the help of software that emulates the CPU of an arcade machine. Unlike the SNES or other versions, games that are played on these emulators will be exactly the same as their arcade versions.

Though it is possible to find a number of examples for arcade machine emulators, MAME is undoubtedly the most popular choice among arcade gaming enthusiasts. We will focus on MAME in this article, leaving the reader to explore the other alternatives.

The MAME (which stands for Multiple Arcade Machine Emulator) Project is defined on its website as "a strictly non-profit project whose main purpose is to be a reference to the inner workings of the emulated arcade machines, both for educational and preservation purposes". Its first public release was in 1997 and as of version 0.147, it supports 26336 ROM sets with 8726 unique games (according to this data).

The first step of playing games with MAME is to download the program. For Windows, it can be downloaded for free from the project website, http://www.mamedev.org/. There are different options for download, such as 64-bit, i686 optimized etc., you should get the best choice for your system. For other operating systems, there are ports of MAME to Mac OS X, Linux and other operating systems/devices. The website for these ports can easily be found by googling "MAME <operating system name>". There is also a graphical user-interface version of MAME, called MAMEUI (formerly MAME32) for those who don't want to use the command-line version. For this article, we will restrict ourselves to the (64-bit) command-line version, however the principles are more or less the same for every version of MAME. We note that for advanced users, it is also possible to download the source code from the same webpage.

After downloading the program (as of present, the latest version is 0.148), run the exe file and it will extract the files to a folder of your choice, no further installation is necessary. In this tutorial, we will assume that MAME is placed on "c:\mame". To be able to play games though, you still need the data files for the game you want to play, which are known as ROMs. A word of copyright caution is due at this point. Although the MAME software is free, the ROMs and other game-specific files are copyrighted material and depending on the game, it may not be legal to download these files without permission from the copyright owner. Even if you own the PCB (printed circuit board, i.e. the game in hardware form), you might still need explicit permission from the manufacturer to legally play the game on MAME. For more information, check out the "Legal" section on the MAME website. There are some ROMs on MAME website which are authorized to be freely downloaded and used for non-commercial purposes.

After obtaining the ROM for the game you wish to play, place it in the "roms" folder in your MAME directory. ROMs usually come zipped, you should not unzip these files. There are two ways to run your game after this point. You can enter the following in the command prompt:

c:\mame>mame64.exe

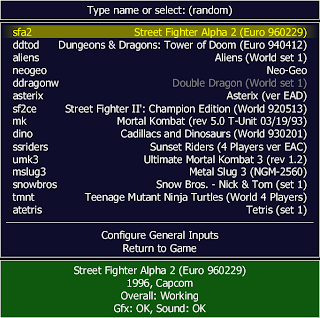
This will bring a list of games found in your "roms" folder. You can also double-click the file "mame64.exe" in your MAME directory to get the same list.

The other way to run a game is to include the name of the ROM file of the game to the command, which will start the game directly. For instance, if you want to play the game "Hard Hat", you should enter the following command:

c:\mame>mame64.exe hardhat

Here, "hardhat" is the name of the ROM file. If the game does not start, this could be because of a number of reasons. Double check that the ROM file is in the "roms" directory, with the correct name and extension. It is important that the name of the zip file is exactly the same as what the program is expecting, otherwise MAME will not be able to start the game. Next, it could be that the game needs another file to run. For instance, Neo-Geo games will require what is known as a "Neo-Geo Bios" file to run. Finally, you might have an old version of the ROM file. As new versions of MAME come out, some games are updated and your ROM file should be the most recent version of the game as well. If you suspect this might be the case, try obtaining the ROM file from different sources.

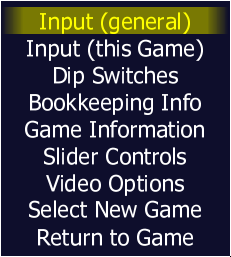
Once you get the game running, you might want to re-define the controls for the game. To do this, press the TAB button while running the game.

From the menu, you can define the keys just for the game you are playing (Input (This Game) option) or for all the games (Input (General) option). Depending on the game, options such as difficulty, starting lives, bonus lives etc. may be changed from the "Dip Switches" section. You might also want to go to the "Video Options" section and try different video modes to see which one you like the best.

If you would like to use a joystick, you should add the "-joy" option to the command. For instance, to play the game "Hard Hat" with a joystick, enter the following command:

c:\mame>mame64.exe hardhat -joy

Similarly, if you would like to use mouse as a controller (for shooting games for instance), you should use the "-mouse" option.

If you want to keep your ROM files in a different folder (for instance, if you have multiple versions of MAME and would like all of them to use the same ROM folder), you should first ask MAME to create a config file by entering the following:

c:\mame>mame64.exe -cc

This will create a file named "mame.ini" in your MAME directory. Next, open this file with a text editor and change the value that corresponds to "rompath" with the folder you would like to use.

The last thing I will cover in this tutorial is saving and loading within MAME. This is a very useful feature of MAME, one which you don't get with real arcade machines. While playing a game, you can save your progress by pressing SHIFT+F7 and then choosing a position (i.e. a number from 1 to 9). Later (of course, when you are running the same game) you can go back to your saved position by pressing F7 followed by the number you chose when you saved the game. When you want to play a certain part of the game, like a fight with a final boss, this feature will save you the trouble of playing the whole game to get to that point.

Wednesday, April 10, 2013

Detailed Review - Final Fight

I am back with a review of another classic arcade game of the 90's, namely Final Fight. Though this game was never as popular as Street Fighter 2 (and I don't think any other game of that period was), I think it can be considered as the next popular arcade game. In Turkey, this game was more commonly known as "Haggar" among arcade gamers, which is the name of one of the characters in this game. This is one of my all time favorite arcade games; I bet among all arcade games, I spent the most money on this one.

I saw this game in the arcade of a movie theater for the first time, it was not the closest place to my home but still it was walking distance. Just like the other arcade which had an original Street Fighter 2 cabinet, this one had an original Final Fight cabinet, which again I realized much later after I saw this game running on generic cabinets in other places. This place was the only place where I saw an original Final Fight cabinet, again just like the Street Fighter 2.

The story of the game is presented in the opening cinematic as follows:

Metro City, a well known Crime Capital, has been ruled by violence and death for many years. A fact which the newly-elected mayor and former Street Fighter, Mike Haggar, plans to change. At the center of the problem is the huge gang known as Mad Gear. Mad Gear controls all of the major criminal activity in the city. When they learned of Haggar's plans, they took immediate action to bring this new mayor under their control.

Sometime in the 1990's...

"Hello, Mike Haggar here."
"Hee hee hee, Mr. Haggar. So pleased to make your acquaintance. I believe you know who I am. Don't hang up! We have a little business proposition for you... Your daughter for your cooperation. And we'll throw in the regular monthly bonus to your salary we offered before."
"What?! What's happened to Jessica? Who is this?!"
"Not so fast, Mike. Turn on your TV."
"You son of a... What have you done to her?"
"Nothing yet... but we'd enjoy the opportunity... Listen to reason, man. Why make your job difficult? Just let us do as we please like the mayor before you did."

The rest of the story isn't very hard to guess: Instead of bowing to Mad Gear's demands, Haggar recruits Jessica's sweetheart from childhood Cody and Cody's friend Guy and the three of them embark on a journey through the streets of Metro City to kick the crap out of every member of Mad Gear and save Jessica.

We choose a character for ourselves before the fighting can begin. Each character has its own strong and weak points, therefore the flavor of the game may change slightly depending on the character we choose. The first of these characters is Guy. According to his official profile in the game, "He has mastered the art of Ninjitsu and attacks with unequaled speed. He often catches his opponents off guard with his special 'Off-the-wall' jump.". As this description suggests, Guy's deal is mostly about speed; anyone intending to play this game with Guy should know and make use of this fact. The "Off-the-wall" jump is also a nice move, but I don't think it is that useful.

Next playable character in Final Fight is Cody; who is described in the game as "He is a martial arts expert. He is especially good with knives. His girlfriend, Jessica, was kidnapped by the Mad Gear gang.". Cody has a nice balance between speed and strength, he is fast but his attacks can still deal a good amount of damage. He is also my favorite character in this game and I usually choose him when I play. The remark about the knives in his description refers to the fact that he is the only character in the game who can stab someone with a knife, all other characters can only toss the knife. For someone who is not very familiar with this game, Cody is probably the best choice among the three playable characters.

The third and the last character in the game is Haggar. His profile in the game reads as follows: "He is a former champion Street Fighter. He's the new mayor of Metro City. He has mastered professional wrestling skills and is expert at the BACK DROP and the PILE DRIVER." Haggar's fighting style is immediately distinguished from that of Guy's and Cody's, he's definitely the slowest character that you can choose, but his moves are capable of inflicting a great amount of damage to his opponents. The pile driver, which we used to call "between-the-legs" in those days, is the most damaging move any character that can perform in this game, including most of the villains.

Here's a video of the game I made, complete with the opening and ending cut-scenes:

Below you will find a list of special moves for each character. Note that some of these moves require your character to "grab" an enemy, which is done by getting very close to the enemy without attacking or jumping. When Guy and Cody successfully grab an enemy, they will remain stationary whereas Haggar can carry around the victim. For the moves, F, B, U and D stand for forward, back, up and down respectively. J stands for jump and P stands for punch.

Character Moves
Guy
Flying Kick: F + J, P
Jumping Kick: J, P
Flying Knee: F + J, D + P or B + J, D + P
Forward Shoulder Throw: (grab) F + P
Backward Shoulder Throw:(grab) B (or U or D) + P
Shoulder Throw after Punch: P, P, P, P, B (or U or D) + P
Knee: (grab) P (up to three times)
Off-the-wall Jump: Jump to a wall, telephone boot, barrel etc., then J
Off-the-wall Jumping Kick: Do the Off-the-wall jump, then P
Spinning Kick: P + J
Cody
Flying Kick: F + J, P
Jumping Kick: J, P
Flying Knee: F + J, D + P or B + J, D + P
Forward Shoulder Throw: (grab) F + P
Backward Shoulder Throw: (grab) B (or U or D) + P
Shoulder Throw after Punch: P, P, P, B (or U or D) + P
Knee: (grab) P (up to three times)
Spinning Kick: P + J
Haggar
Flying Kick: F + J, P or J + P
Flying Body Attack: F + J, D + P or B + J, D + P
Forward Back Drop: (grab) F + P
Backward Back Drop: (grab) B (or U or D) + P
Back Drop after Punch: P, P, B (or U or D) + P
Headbutt: (grab) P (up to three times)
Pile Diver: (grab) J, P
Spinning Clothesline: P + J

In the course of the game, we will encounter many different kinds of enemies. Some of these enemies die after just a few punches while others have even more energy than our character. There are also bosses that appear at the end each level, which take a lot of effort to kill. They usually have their own special attacks, such as guns, bombs, arrows etc. Here's a list of the enemies:

Character Remarks
Bred
The very first enemy to encounter, also the easiest. He's no problem to handle when he's on his own, but when you are fighting someone else he will try to sneak up from behind your character and surprise you with a punch or a kick. Has very little energy. He is also the owner of the car that gets trashed in the first bonus stage. Gives 1000 points when killed.
Dug
Very similar to Bred in terms of fighting style, but has a little more energy. Gives 1200 points when killed.
Jake
Similar to Bred and Dug, but has more energy and can attack with flying kicks in addition to Bred and Dug's attacks. Gives 1400 points when killed.
Simons
Similar to Jake, but has more energy. Gives 1600 points when killed.
J
Moves very quickly but has weak attacks. He will wait for your character to turn his back to strike. Gives 1500 points when killed.
Two.P
Similar to J, but has more energy. Gives 2000 points when killed.
Axl
He moves very slowly, but he can block your attacks which can be very annoying, especially if there are other enemies around. He can also land a powerful blow if he gets a chance. The best way to deal with him is usually grabbing him. He gets his name from the lead vocalist of the band Guns 'N Roses, who were at the height of their popularity when this game was made. Gives 2000 points when killed.
Slash
Similar to Axl, but has more energy. He takes his name from the lead guitar player of Guns 'N Roses at that time. Gives 2500 points when killed.
G. Oriber
His most dangerous move is a running headbutt, which can catch the player by surprise. He also has a standing headbutt and a kick attack but they are not nearly as dangerous as the running attack. Supposedly, his first name is Graham. Gives 2000 points when killed.
Bill Bull
Similar to G. Oriber, but has more energy. Gives 2500 points when killed.
Wong Who
Similar to G. Oriber and Bill Bull, but has more energy than both of them. Also, seems to me like he uses the running headbutt less often then the other two. Gives 3000 points when killed.
Roxy
She is very fast, possibly the fastest non-boss character in the game. In addition to her kicks and slaps, she has acrobatic flip kick attacks. She can also jump behind your character, which becomes a major problem when your character is busy fighting a crowd of enemies. Gives 2000 points when killed.
Poison
Similar to Roxy, but has more energy. She also appears in a number of other Capcom games. She's possibly the most controversial Capcom character because of her transgender status. See her Wikipedia page for more information. Gives 3000 points when killed.
Holly Wood
An extremely dangerous opponent who can attack from a distance as well as from close range. He can stab, throw a knife, slide kick or jump-stab your character. When dealing with a crowd, it is probably a good idea to take care of him first. He is also a source of knives, which can be useful especially when playing with Cody. Gives 3000 points when killed.
Holly Wood (Red)
This version of Holly Wood just appears briefly, throws a Molotov cocktail and leaves. It is quite tough to catch him, but it takes just a punch to kill him; although killing him will not do much good since his Molotov cocktail will go flying in the air anyways. If you can hit his Molotov cocktail in the air, not only you will not have to avoid the flames but also you will earn 2000 points. Gives 1000 points when killed.
El Gado
Similar to Holly Wood, but has more energy. Gives 4000 points when killed.
Andore Jr.
A pro-wrestler like Haggar, he is the most dangerous non-boss enemy type to find in this game. He can punch, choke, pile drive or do a jumping attack; in addition to his running attack which is capable of catching the player by surprise. Gives 3000 points when killed.
Andore
Similar to Andore Jr., but has more energy; or perhaps Andore Jr. is the weaker version of him. He is modeled after the famous pro-wrestler Andre the Giant. Just like Poison, he also appears in a number of other Capcom games. Gives 4000 points when killed.
G. Andore
Also known as Grandfather Andore, he is just like Andore but has slightly more energy. He appears only once, in the boxing ring in round 3. Gives 4000 points when killed.
F. Andore
Also known as Father Andore, he is identical to G. Andore. Just like G. Andore, he also appears only once in the boxing ring in round 3. Gives 4000 points when killed.
U. Andore
Also known as Uncle Andore, he is identical to G. Andore and F. Andore. He also appears just once in the boxing ring just like G. Andore and F. Andore; but he will only appear in two player games. Gives 4000 points when killed.
Damnd
He is the first and definitely the easiest boss to be encountered. He has no other attacks than a punch and a rolling kick. He should not be a problem as long as the the accompanying crowd is handled properly. Gives 10000 points when killed.
Sodom
He is the boss of the second stage. Although there are no other thugs to help him, he is not an easy boss. His main attack is the running headbutt which is hard to counter. He can also attack with his swords and he will punch you if he lost the swords. He also appears in a number of other Capcom games. Finally, in the SNES version of this game, his name was changed to "Katana" because of the reference to sodomy in his name. Gives 20000 points when killed.
Edi. E
Usually referred to as "The Cop", he is the boss of the third stage. He will first attack with his baton and after his life bar drops to a certain level, he will draw his gun and start shooting you. One trick to fight him is not to scroll all the way; that way you will not have to fight the underlings until he draws his gun. He moves fast and his gun deals a good amount of damage, but he is not a very hard boss to fight. Gives 30000 points when killed.
Rolento
He is the boss of the fourth stage. He is extremely fast and has a variety of attacks, such as the staff attack, the flying kicks and the shoulder toss. In addition, he will start throwing grenades when he is low on energy. He is though to fight at first, but once you get a hang of the way he moves, he will become quite predictable. He appears in a number of other Capcom games. Finally, it is claimed that the underlings Axl, Slash, Holly Wood and El Gado are his henchmen, who are trained by him. Gives 40000 points when killed.
Abigail
He is the last boss before the final boss. A careful observer will notice that his body is exactly the same as that of an Andore, only his head is different. His attacks are different from Andore, except the punch. He can toss your player like a basketball and he has two different running attacks. In one of his running attacks, his face and exposed parts of his body (and strangely enough, his shoes) will turn red. He is a mighty opponent and should be handled with care. Gives 50000 points when killed.
Belger
He is the leader of the Mad Gear gang and the final boss in this game. He will meet you in his wheelchair, with Haggar's daughter Jessica in his arms. He carries a crossbow and that is his only way of attacking, though he can use it in a variety of ways. He also jumps frequently, which makes him hard to get a hold of. All in all, he makes a worthy final boss. When his energy runs out, he will crash through the window and fall to his death. Gives 100000 points when killed.

There are a number of items in the game with various effects. Here's a (complete?) list of items that you may come across:

Item Remarks
Knife
Cody's preferred weapon. Guy and Haggar can throw it and Cody can either stab close enemies or throw it. Holly Wood and El Gado usually drop plenty of knives. You will get 500 points if you are holding a knife at the end of a round, getting off on on the subway, entering a building etc.
Pipe
Haggar's preferred weapon. You will get 800 points if you are holding a pipe at the end of a round, getting off on on the subway, entering a building etc.
Muramasa
Guy's preferred weapon. You will get 1000 points if you are holding this at the end of a round, getting off on on the subway, entering a building etc.
Masamune
Identical looking to Muramasa, this is the sword that Sodom uses. It is rumored that this sword is slightly stronger than Muramasa, but I have no way of testing that theory. You will get an additional 1000 points if you are holding this at the end of the fight with Sodom.
Beer
Heals up to 11% energy. Gives 1000 points if taken when the energy bar is full.
Beer
Heals up to 11% energy. Gives 1000 points if taken when the energy bar is full.
Beer
Heals up to 11% energy. Gives 1000 points if taken when the energy bar is full.
Gum
Heals up to 11% energy. Gives 1000 points if taken when the energy bar is full.
Soft Drink
Heals up to 11% energy. Gives 1000 points if taken when the energy bar is full.
Whisky
Heals up to 11% energy. Gives 1000 points if taken when the energy bar is full.
Apple
Heals up to 22% energy. Gives 3000 points if taken when the energy bar is full.
Banana
Heals up to 22% energy. Gives 3000 points if taken when the energy bar is full.
Grapes
Heals up to 22% energy. Gives 3000 points if taken when the energy bar is full.
Orange
Heals up to 22% energy. Gives 3000 points if taken when the energy bar is full.
Pineapple
Heals up to 22% energy. Gives 3000 points if taken when the energy bar is full.
Curry
Heals up to 44% energy. Gives 5000 points if taken when the energy bar is full.
Hamburger
Heals up to 44% energy. Gives 5000 points if taken when the energy bar is full.
Hot Dog
Heals up to 44% energy. Gives 5000 points if taken when the energy bar is full.
Pizza
Heals up to 44% energy. Gives 5000 points if taken when the energy bar is full.
Sushi
Heals up to 44% energy. Gives 5000 points if taken when the energy bar is full.
Barbecue
Heals up to 89% energy. Gives 10000 points if taken when the energy bar is full.
Chicken
Heals up to 89% energy. Gives 10000 points if taken when the energy bar is full.
Steak
Heals up to 89% energy. Gives 10000 points if taken when the energy bar is full.
Edi. E's Gum
Heals up to 44% energy. Gives 40000 points if taken when the energy bar is full.
Hammer
Gives 1000 points.
Hat
Gives 1000 points.
Radio
Gives 1000 points.
Napkin
Gives 1000 points.
Dollar
Gives 3000 points.
Watch
Gives 3000 points.
Yen
Gives 3000 points.
Yen
Gives 3000 points.
Emerald
Gives 5000 points.
Necklace
Gives 5000 points.
Pearl
Gives 5000 points.
Ruby
Gives 5000 points.
Topaz
Gives 5000 points.
Diamond
Gives 10000 points.
Gold Bar
Gives 10000 points.
Dustbin
May reveal an item. Gives 500 points when broken.
Billboard
May reveal an item. Gives 600 points when broken.
Barrel
May reveal an item. Gives 800 points when broken.
Drumcan
May reveal an item. Gives 800 points when broken. The rolling drumcans will give 3000 points when broken.
Tire
May reveal an item. Gives 800 points when broken.
Freight
Appears only once, in the first stage. Usually reveals a pipe. Gives 1000 points when broken.
Tel. Booth
May reveal an item. Gives 1500 points when broken.

I would like to conclude this review with a few hints about this game:

  • You will often find yourself fighting a large number of enemies. The key to successfully handle such a situation is to have all the opponents in front of you. The move that I call "Shoulder Throw after Punch" (or "Back Drop after Punch" for Haggar) is very useful for this purpose. I use this move many times in the video, I think the earliest instance is at 2:52. A good example of using this move to move opponents from one side to other can be seen at 11:15.
  • As you scroll forward, more enemies will show up; so generally you should not move on until you kill the enemies you already have on the screen. There is an exception to this, however. Sometimes, if you can move really fast, some of the opponents will not be able to catch up with you and you will end up fighting less enemies. This technique is especially useful against slow, bulky enemies such as G. Orbier and his look-alikes, members of the Andore family, etc.
  • There is a method called "shifting" which is a little hard to perform but very powerful, especially against the bosses. This method can be used only when playing with Guy or Cody. After punching the enemy twice, turn your back on the enemy for a brief moment and then turn towards the enemy again, punch twice, turn back and so on. This can be repeated indefinitely. We used to call this method "the left-right" in the old days.
  • In the subway, if you don't want to fight the enemies at the very end of the train, jump onto the barrels and wait. They may break first two of the barrels, but they won't touch the last three and eventually, train will stop and you will get off.
  • Against Edi E., you can avoid fighting the underlings if you stop scrolling as soon as Edi E.'s name appear on the screen. Beat him up until he draws his gun and then move in for a quick kill. That way, you will either fight no underlings or very few of them.
  • Apparently, if you can have six knives on the screen, Edi E. won't fire his gun. I could never manage to do this myself, but there are videos on YouTube that demonstrate this phenomenon.
  • Right after Edi E., at the beginning of the new stage, there is an easy way to avoid being burned by the flames. Keep your vertical position constant, in other words, never move up or down; just move left and right. With the exception of the first two set of flames, no other flame will burn you. You need to either jump over or time your move to avoid the first two flames. You can watch me demonstrate this trick in the video at 16:30.
  • In the last stage, there are hidden items behind some of the columns. For example, see 46:03, 46:08, 46:46, 46:52, 47:07, 47:51 and 47:53 in the video.